


Regarding the procedure for opening a new account with Exness,
We will explain it with diagrams and smartphone images so that anyone can easily understand it
結論から言うと、Exness(エクスネス)は、
You can easily open an account and set up cashback in just two steps
- Step 1: Create an Exness account
- Step 2: Apply for FX account registration from your MoneyCharger My Page
Contents
- 1 Step 1: Create an Exness account
- 1.1 ① Go to the Exness account creation page
- 1.2 ② Entering registration information
- 1.3 ③必要情報を記入します。
- 1.4 ④「Real Account」をタップします。
- 1.5 ⑤書類のアップロード
- 1.6 ⑥「Get Started now」をタップします。
- 1.7 ⑦登録メールアドレスへ届いた6桁の認証コードを入力します。
- 1.8 ⑧「Complet now」をタップします。
- 1.9 ⑨個人情報を入力します。
- 1.10 ⑩口座開設の目的を選択します。
- 1.11 ⑪雇用状況を選択します。
- 1.12 ⑫職業を選択してください。
- 1.13 ⑬主な収入源を選択します。
- 1.14 ⑭推定資産を選択してください。
- 1.15 ⑮年収を選択してください。
- 1.16 ⑯Exnessに年収の何パーセントを投資する予定か選択してください。
- 1.17 ⑰過去3年間のCFD取引の経験を選択してください。
- 1.18 ⑱1週間に投資に費やしている時間を選択してください。
- 1.19 ⑲CFDに関する資格は持っていますか?
- 1.20 ⑳「1,000EUR」を選択
- 1.21 ㉑上の選択肢を選択
- 1.22 ㉒「Keep it as a prestigious hobby」を選択
- 1.23 ㉓取引予定の商品を選択してください。
- 1.24 ㉔「Online search」を選択します。
- 1.25 ㉕3か所すべてにチェックを入れ、「Submit」をタップします。
- 1.26 ㉖登録する電話番号を入力します。
- 1.27 ㉗SMSで届いた6桁の認証コードを入力します。
- 1.28 ㉘「Verify identity now」をタップします。
- 1.29 ㉙身分証明書を提出します。「Uploded documents」をタップしてください。
- 1.30 ㉚チェックを入れ、「Submit Doucument」をタップ
- 1.31 ㉛提出する身分証をタップしてください。
- 1.32 ㉜タップして書類をアップロードします。
- 1.33 ㉝身分証のアプロードは完了です。
- 1.34 ㉞審査完了しましたらこのようなメールが届きます。
- 1.35 ㉟住所証明書類の提出に進みます。
- 1.36 ㊱提出可能な住所証明書類を確認してください。
- 1.37 ㊲タップして書類をアップロードします。
- 1.38 ㊳「Submit Document」をタップします。
- 1.39 ㊴通常10分以内に審査が完了し、メールが届きます。
- 1.40 ㊵審査が完了しましたらこのようなメールが届きます。
- 1.41 ㊶「My accounts」をタップします。
- 1.42 ㊷「Open account」をタップします。
- 1.43 ㊸作成する口座を左右にスワイプして選択します。
- 1.44 ㊹口座へのログインパスワード等を設定します。
- 1.45 ㊺口座番号とサーバー名が表示されますので、先ほどのパスワードと合わせてメモしておきましょう。
- 2 Step 2: Apply for FX account registration from your MoneyCharger My Page
- 3 In conclusion
Step 1: Create an Exness account
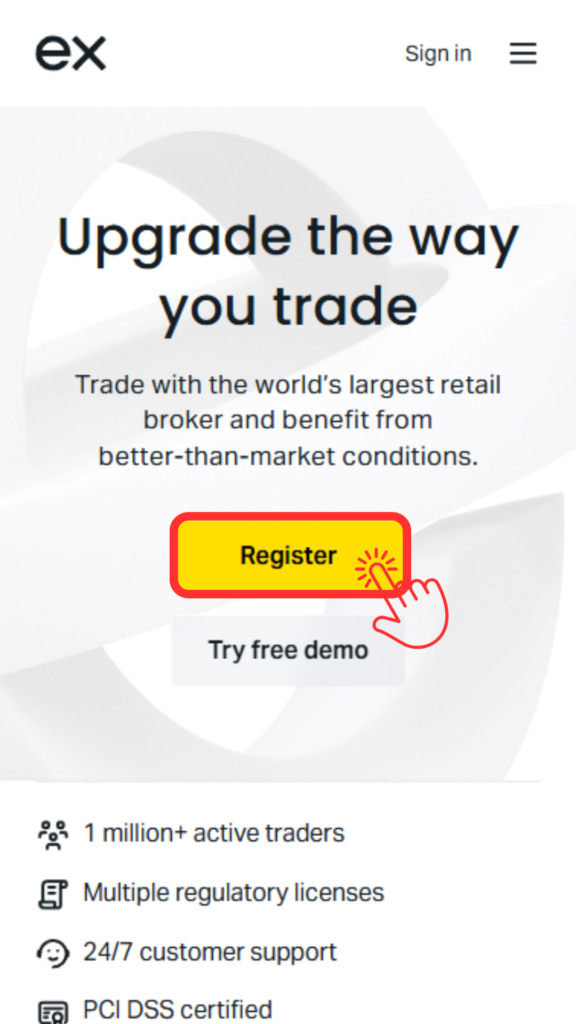
① Go to the Exness account creation page
First, please go to the Exness account creation page via the link below
※こちらのリンク以外からの登録を行うとキャッシュバックが受け取れないのでご注意ください。
② Entering registration information
「Register」をタップします。
③必要情報を記入します。

④「Real Account」をタップします。

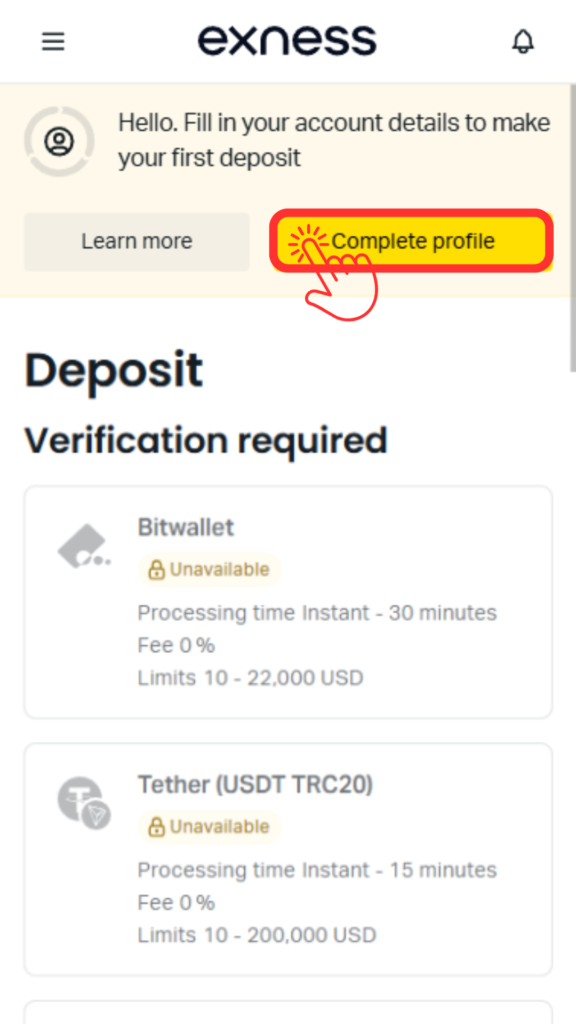
⑤書類のアップロード
「Complete profile」をタップします。
⑥「Get Started now」をタップします。

⑦登録メールアドレスへ届いた6桁の認証コードを入力します。

⑧「Complet now」をタップします。

⑨個人情報を入力します。

⑩口座開設の目的を選択します。

⑪雇用状況を選択します。

⑫職業を選択してください。

⑬主な収入源を選択します。

⑭推定資産を選択してください。

⑮年収を選択してください。

⑯Exnessに年収の何パーセントを投資する予定か選択してください。

⑰過去3年間のCFD取引の経験を選択してください。

⑱1週間に投資に費やしている時間を選択してください。

⑲CFDに関する資格は持っていますか?

⑳「1,000EUR」を選択

㉑上の選択肢を選択

㉒「Keep it as a prestigious hobby」を選択

㉓取引予定の商品を選択してください。

㉔「Online search」を選択します。

㉕3か所すべてにチェックを入れ、「Submit」をタップします。

㉖登録する電話番号を入力します。
※頭の0を除いて入力してください(例:080-1234-5678の場合、8012345678)
※SMSが受信できる番号を入力してください。

㉗SMSで届いた6桁の認証コードを入力します。

㉘「Verify identity now」をタップします。

㉙身分証明書を提出します。「Uploded documents」をタップしてください。

㉚チェックを入れ、「Submit Doucument」をタップ

㉛提出する身分証をタップしてください。
Passport:パスポート
Driver’s license:運転免許証
ID card:マイナンバーカード
Residenc Card:在留カード

㉜タップして書類をアップロードします。

㉝身分証のアプロードは完了です。
通常10分以内に結果の連絡が届きます。

㉞審査完了しましたらこのようなメールが届きます。
タップして先に進みます。

㉟住所証明書類の提出に進みます。
再度マイページから「Complete profile」をタップします。

㊱提出可能な住所証明書類を確認してください。
マイナンバーカード、住民票、公共料金の支払い明細書などがご利用いただけます。

㊲タップして書類をアップロードします。

㊳「Submit Document」をタップします。

㊴通常10分以内に審査が完了し、メールが届きます。

㊵審査が完了しましたらこのようなメールが届きます。
次は取引口座を作成しますので、「入金手続きへ進む」をタップし、マイページにログインします。

㊶「My accounts」をタップします。

㊷「Open account」をタップします。

㊸作成する口座を左右にスワイプして選択します。
初めての方はStandardをお勧めします。

㊹口座へのログインパスワード等を設定します。

㊺口座番号とサーバー名が表示されますので、先ほどのパスワードと合わせてメモしておきましょう。

お疲れ様でした。
Exnessでの手続きは以上です。
次はマネチャでの口座登録に移ります。
Step 2: Apply for FX account registration from your MoneyCharger My Page
Next, you will apply to register for an FX account from your MoneyCharger My Page
① Go to the MoneyCharger My Page login screen from the link below
The login page for MoneyCharger is here

②左上の三本線をクリック

③ Click "Register Account"

④ Enter the required information

Thank you for your hard work. Your application is now complete
If there are no problems with your application within one business day of submission, the status at the bottom of "Account Registration" will change to "Approved"

You can now receive cashback with MoneyCharger
In conclusion
以上がExnessの新規口座開設手順のスマホ画像付きの図解解説になります。
Next, let's check the withdrawal procedure on your Money Charger My Page

